SPECIMEN images
a. Take pictures using the high-quality mode on your camera. If a fairly wide aperture (for shallow depth of field) is employed, background shadows will be negligible. BOLD can accept photos up to 20MP.
b. The specimen should be centered in the image frame.
c. Photos should be taken as close-up to the specimen as possible, leaving very little gap around the edges.
d. Use Landscape orientation.
e. Use 2 × 3 aspect ratio if possible. This will ensure that the images are not skewed when viewed in the BOLD image library.
f. If desired, a measurement scale may be included in the image to provide a size reference.
g. Use a standardized orientation as this makes it much easier to compare specimens within a project.
h. Save the images in .jpg format (e.g., A1.jpg). It is good practice to save the images file with the Sample ID as the file name.
Dorsal: The anterior of the specimen should be facing the top of the image frame. The specimen should be face-down, with the dorsal aspect of the head visible.
Lateral: The anterior of the specimen should be facing the left side of the image frame. The specimen should be oriented with the feet towards the bottom of the image.
Ventral: The anterior of the specimen should be facing the top of the image frame. The specimen should be face-up, with the ventral aspect of the head visible.
Submitting images to bold
a. Create a folder on your Desktop called Images and place in it all the image files (in .jpg format) you would like to upload.
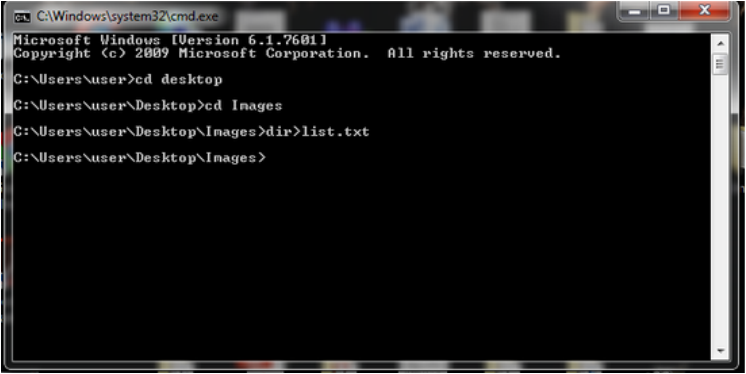
b. To create a list of the files in the Images folder open a terminal window. On a Windows computer type "cmd" into the search box in the "start" menu and click on the cmd program to open it. To navigate to the Images folder, type cd desktop, press enter, type cd Images, press enter. Next type dir > list.txt, press enter.
b. To create a list of the files in the Images folder open a terminal window. On a Windows computer type "cmd" into the search box in the "start" menu and click on the cmd program to open it. To navigate to the Images folder, type cd desktop, press enter, type cd Images, press enter. Next type dir > list.txt, press enter.
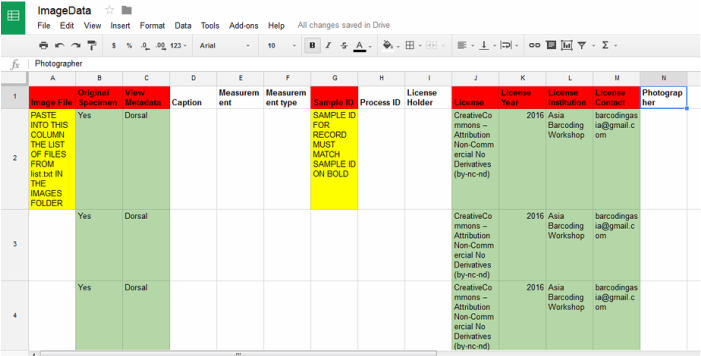
c. Complete the following table.
1. RED BOXES indicate columns which must be completed.
2. GREEN BOXES show examples of how to complete the columns.
3. YELLOW BOXES contain instructions on how to fill the columns.
d. Obtain the Sample ID from your project on BOLD. From the Project Console, click on View All Records. The Sample IDs are listed in the column under Specimen Page.
e. Save the file as ImageData.xls into the Images folder on your Desktop.
f. The folder Images needs to be zipped before submission to BOLD. Most modern operating systems have built-in functionality for zipping so this simply requires rightclicking on the folder and selecting "Compress Images”, "Add to Images.zip" or something similar. [Note: if your PC doesn't already have a program for zipping files, a free program WinRar can be downloaded]
g. Navigate to your BOLD project’s Project Console and under the Uploads menu on the left click Specimen Images . Browse through to Images.zip on the desktop and click Submit.
Images provided for this workshop can be downloaded here. Submit the provided images to BOLD for all your records on BOLD following the instructions above.
