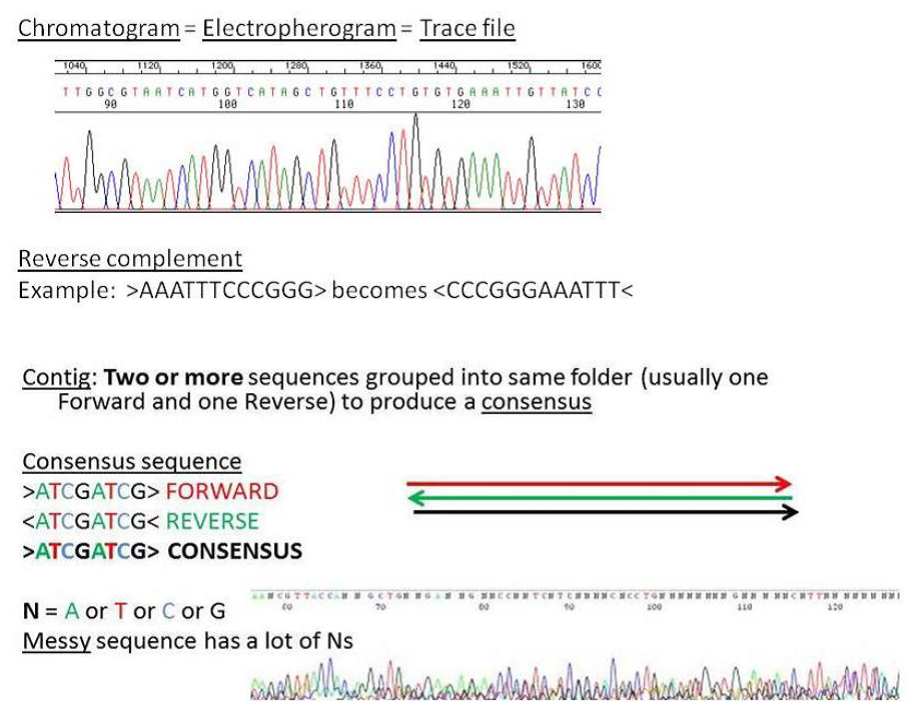
important vocabulary
Getting sequences back from sequencing company
a. Your sequences will come back from the sequencing company in a zip folder (e.g. Sequences.zip) by email.
b. Unpack (extract) the zip file to your desktop. This should create a regular folder on your desktop, which you can name "Traces". There are two sets of files for each sequence (e.g. NUMBEROFSAMPLE_F.ab1 and NUMBEROFSAMPLE_F.txt). The files you are interested in have an extension .ab1 (e.g. NUMBEROFSAMPLE_F.ab1 and NUMBEROFSAMPLE_R.ab1). Delete the other files in the folder.
For this workshop a zip file, like the kind you would get from a sequencing company, is provided for download here.
Sequence editing using codoncode aligner
Information on CodonCode Aligner, including a free trial version, can be found at http://www.codoncode.com/. We are
grateful to CodonCode Corp for providing training licenses during educational workshops.
a. Open CodonCode Aligner and choose Create a new project and press OK. [make sure to select option to connect through the license server if requested]
b. Go to File>Import>Add Folder... navigate to the desktop and select the folder of traces [which should be named "Traces" if you followed the suggestion above]. Click Open>Import.
c. To see the files you just imported press ► besides the Unassembled Samples folder
d. The .ab1 files should be of the form NUMBEROFSAMPLE_F.ab1 where the second part “F” refers to the direction, i.e. Forward.
e. Sort the files by quality by double-clicking on Quality. Any sequences that are of very poor quality (look for a big difference between the sequence length and the quality score) can be deleted by highlighting the sequence and clicking Edit>Move to Trash. [For this workshop no sequences need to be deleted]
f. Next we will group our sequences by direction for easy editing.
g. Make sure the Unassembled Samples folder is highlighted. Select the Contig menu and move the cursor over Advanced Assembly. From the options that appear select Assemble in Groups.
h. A new window will appear. Click the button Define name parts...
i. There are two name parts to our file names (see above). The first part of our file names refers to the number of the sample and for our purposes the option in the Meaning menu (first row) can be left as Clone. Since the sample number is followed by an underscore, choose _ (underscore) in the Delimiter menu next to Clone (if it isn’t already selected).
j. For the second row choose Direction in the Meaning menu. We can ignore the Delimiter menu for the Direction part because there is nothing following the direction in our file names.
k. Delete all additional name parts that may appear in the window (if any), and next click Preview... to check how CodonCode Aligner is interpreting the sample names.
l. Click Close to exit the preview. Click OK to return to the Assemble in Groups window.
m. We first want to assemble our samples according to direction. Choose Direction in the Name part: dropdown menu. Then click Assemble. You should now have two folders, one called F with the forward sequences and one called R with the reverse sequences. [Note: if you only sent your PCR products for sequencing in one direction (with one primer) then you will only have one folder.]
n. We will deal with the reverse sequences first. The first step is to reverse complement the sequences (see 8. SANGER SEQUENCING). Highlight the R folder, select Edit>Reverse complement.
o. Next we need to cut the primer from the sequence (why? see 8. SANGER SEQUENCING). Double click the R folder to open it. For the reverse sequences, you need to find the forward primer motif and delete it from the beginning of the consensus sequence at the bottom of the window. You will find the primer around 30 nucleotides from the end of the raw sequence. For example, you would need to delete the section of the sequence marked below in bold and everything to the left of it. Highlight it on the consensus sequence at the bottom of the window and press the Backspace key on the keyboard.
←AAAGATATTGGAACATTATATTTTATTTTT.....
p. Next go to the opposite end of the consensus, the far right. Delete the consensus sequence from the point where the sequence gets messy. This will be apparent due to lots of green highlight. For example [it won't look exactly like this], delete the section marked in bold and everything to the right of it. Highlight it on the consensus sequence at the bottom of the window and press the Delete key on the keyboard. Close the window.
...TCTTTTTTTGACCCTGCTGGTGGAGGGTTTGGTAATTTTGC→
q. Double click the F folder to open it. Go to the far right of the consensus sequence and find the reverse complement reverse primer motif at the very end (why? see 8. SANGER SEQUENCING). This should be around 650bp on the raw sequence. For example, you would delete the section marked in bold and everything to the right of it. Highlight it on the consensus sequence at the bottom of the window and press the Delete key on the keyboard.
...CAACATTTATTTTGATTTTTTGG→
r. Next go to the opposite end of the consensus, the far left, and delete the consensus sequence from the point where the sequences get messy. This will be apparent due to lots of green highlight. For example [it won't look exactly like this], you would delete the sequence in bold and and everything to the left of it. Highlight the region on the consensus sequence at the bottom of the window and press the Backspace key on the keyboard. Close the window.
←ATGCTTTTTTTTGATGTTTAATCAGGACTAATTGGAACTTC
s. Dissolve both the F and R folders by highlighting them and clicking the button marked with a red X.
t. Now we are going to combine the forward and reverse sequence from each specimen into a contig. Highlight the Unassembled Samples folder and open the Contig menu. Move the cursor over Advanced Assembly. From the options that appear select Assemble in Groups. This time choose Clone in the Name part: menu, then click Assemble. [Note: if you only sent your PCR products for sequencing in one direction (with one primer) then you will need to check each sequence individually rather than checking a consensus (contig).][Note: specimens which only sequenced successfully in one direction will have files which remain in the Unassembled Samples folder.]
u. The contigs are likely to be in reverse complement orientation. Highlight every folder (contig), select Edit>Reverse complement.
v. Open each folder (contig) in turn by double-clicking. Correct ambiguous positions (shown in red, in green highlight, and/or as N) and gaps (“—“) in the consensus sequence by checking the original traces. This is done by double-clicking on the consensus sequence at the bottom of the window. Always check both trace files (forward and reverse) and compare them. Note, the corrected consensus sequence should have NO gaps.
w. Generally if traces conflict (i.e. different colored peaks appear in the same location on the forward and reverse chromatograms) you can decide which is more reliable based on sequence quality (e.g. less background noise, taller peaks).
x. Check the contigs first, then check the individual single sequences in the Unassembled Samples folder, if any.
y. To export the consensus sequences, highlight all the folders, go File>Export>Consensus Sequences..., choose Current selection. Open the Options and select Include gaps in FASTA but deselect all other options. Press Export. Save the file to the desktop as sequences.fasta.
z. If necessary, to export single direction sequences, go File>Export>Samples..., choose Current selection. Press Export. Save the file to the desktop as sequences_single.fasta.
